How to Generate Blog Sections Using TextPixAI Free Tool
Introduction
In the fast-paced digital landscape of today, creating engaging and informative blog content is essential for businesses and individuals alike. High-quality content not only attracts and retains readers but also plays a crucial role in search engine optimization (SEO). However, the process of consistently generating blog sections that captivate your audience can be both time-consuming and challenging. This is where TextPixAI, a free and powerful content generation tool, comes into play.
In this comprehensive guide, we'll walk you through the ins and outs of using TextPixAI to generate blog sections effectively. By the end of this article, you'll have a clear understanding of how to harness the potential of TextPixAI to enhance your content creation process and improve your blog's overall performance in search engine rankings.
You may also like to read:
Blog Title Generator: Your Secret Weapon for Catchy Headlines Using TextPixAI
What is TextPixAI?
Before we dive into the specifics of using TextPixAI, let's start with the basics. TextPixAI is an innovative AI-powered tool designed to assist content creators in generating blog sections and other types of textual content. What sets TextPixAI apart is its ability to seamlessly blend the art of AI-generated text with visually appealing images, making your blog content not only informative but also aesthetically pleasing.
Why Use TextPixAI for Blog Sections?
You might wonder why you should integrate TextPixAI into your content creation toolkit. Here are some compelling reasons:
1. Time Efficiency: With TextPixAI, you can significantly reduce the time spent on brainstorming and drafting blog sections. The tool's AI algorithms can swiftly generate high-quality content, allowing you to focus on other essential aspects of content creation.
2. Enhanced Content Quality: TextPixAI leverages advanced natural language processing to produce coherent and contextually relevant blog sections. The result is content that feels like it was crafted by a human writer, making it engaging and informative.
3. Diverse Content Options: Whether you need an attention-grabbing introduction, informative bullet points, or a compelling conclusion, TextPixAI can create a wide range of content sections tailored to your specific needs.
4. SEO Benefits: Quality content is the backbone of SEO success. By utilizing TextPixAI to consistently produce high-quality blog sections, you can improve your website's search engine rankings and visibility.
Now that you understand the advantages of using TextPixAI, let's embark on a journey to discover how to harness its potential effectively.
Getting Started with TextPixAI
Getting started with TextPixAI is a straightforward process. Follow these steps to begin using this powerful content generation tool:
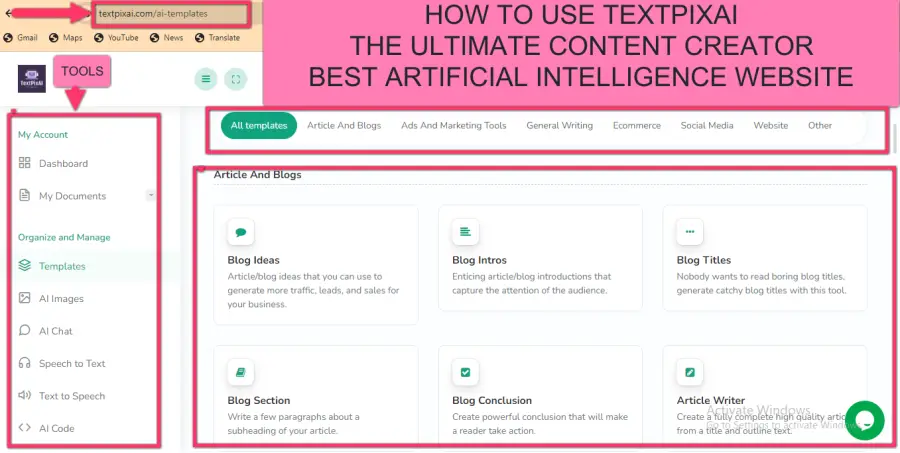
Step 1: Accessing TextPixAI
To access TextPixAI, visit the official website at [textpixai]. You'll find a user-friendly interface that provides easy navigation and access to the tool's features.
Step 2: Registration (If Required)
In some cases, TextPixAI might require you to register for an account. This registration process typically involves providing your email address and creating a password. Registering allows you to save your work and track your content history.
Step 3: Exploring the User Interface
Once you're logged in, take a moment to familiarize yourself with the user interface. You'll find an array of options and templates to customize your content generation experience.
Creating Blog Sections with TextPixAI
Now that you've gained access to TextPixAI, it's time to dive into the process of creating blog sections. Here's a step-by-step guide to help you get started:
Step 1: Define Your Content Goal
Before using TextPixAI, it's essential to have a clear understanding of the blog section you want to generate. Determine your content's purpose, target audience, and the key message you want to convey.
Step 2: Enter Relevant Keywords
In the TextPixAI interface, you'll notice a field where you can enter keywords related to your blog section. This step is crucial as it guides the AI in generating content that aligns with your topic.
Step 3: Select Content Type
TextPixAI offers various content types, including introductions, conclusions, bullet points, and more. Choose the type that suits your content goal. If you're unsure, TextPixAI can provide recommendations based on your keywords.
Step 4: Generate Content
Click the "Generate" button, and TextPixAI will swiftly produce a draft of your blog section. You'll be amazed at how quickly and effectively the tool generates coherent and contextually relevant text.
Step 5: Review and Customize
The generated content will appear in the interface. Take the time to review and customize it to align with your unique style and voice. TextPixAI allows you to edit, add, or remove text as needed.
Step 6: Incorporate Visuals
One of TextPixAI's standout features is its ability to combine text with visuals. You can enhance your blog sections by adding relevant images or graphics to make your content more engaging and informative.
Step 7: Export Your Content
Once you're satisfied with the generated blog section, you can export it in various formats, such as plain text, HTML, or even directly to your content management system (CMS).
Customizing and Editing Content
While TextPixAI's AI algorithms are highly effective at generating content, it's essential to customize and edit the sections to ensure they align with your brand's voice and style. Here are some tips for effective customization:
1. Maintain Consistency: Ensure that the tone and style of the generated content match the overall voice of your blog.
2. Add Personalization: Insert personal anecdotes, examples, or stories to connect with your audience on a more personal level.
3. Check Grammar and Spelling: Utilize grammar-checking tools to eliminate any grammatical errors or typos.
4. Optimize for Readability: Break down long sentences and paragraphs into shorter, more digestible chunks to improve readability.
5. Review for Clarity: Confirm that the content conveys your intended message clearly and concisely.
By following these customization and editing guidelines, you can ensure that the AI-generated blog sections feel like they were crafted by a human writer, enhancing the overall quality of your content.
Tips for SEO Optimization
While TextPixAI can help you create captivating blog sections, SEO optimization remains a crucial aspect of online content. Here are some tips for optimizing your TextPixAI-generated blog sections for search engines:
1. Keyword Integration: Identify relevant keywords for your blog topic and incorporate them naturally into the text. Avoid keyword stuffing, which can harm your SEO efforts.
2. Meta Descriptions: Craft compelling meta descriptions that accurately summarize your blog sections. These descriptions serve as snippets in search engine results and can influence click-through rates.
3. Optimize Headings: Utilize descriptive and keyword-rich headings (H1, H2, H3, etc.) to structure your content effectively. Clear headings improve both SEO and readability.
4. Internal and External Links: Include relevant internal links to other pages on your website and external links to authoritative sources when appropriate. This can boost your content's credibility and SEO ranking.
5. Mobile Optimization: Ensure that your blog sections are mobile-friendly, as mobile optimization is a critical factor in search engine ranking algorithms.
6. Image Optimization: Optimize images by using descriptive file names and alt text. This improves accessibility and can lead to higher rankings in image searches.
By incorporating these SEO best practices into your TextPixAI-generated blog sections, you can increase your content's visibility and reach a wider audience.
Content Quality Assurance
Maintaining the quality and uniqueness of your content is paramount. Here are some strategies to ensure your blog sections meet high standards:
1. Proofreading: After generating and customizing content with TextPixAI, thoroughly proofread it to eliminate errors and improve readability.
2. Plagiarism Check: Utilize plagiarism-checking tools to verify that your content is entirely original and not duplicated from other sources.
3. Engage Beta Readers: If possible, have colleagues or beta readers review your content to provide feedback and identify areas for improvement.
4. Consistency: Ensure that your blog sections maintain a consistent tone, style, and voice throughout your website.
5. Update Regularly: Keep your content up-to-date by revisiting and refreshing older blog sections to reflect current information and trends.
Maintaining the quality and uniqueness of your content not only enhances your website's credibility but also contributes to higher search engine rankings and reader engagement.
Real-World Success Stories
To further illustrate the effectiveness of TextPixAI in content creation, let's explore a couple of real-world success stories:
Case Study 1: Blogger X's Traffic Surge
Blogger X, a travel enthusiast, struggled to consistently produce engaging travel blog sections due to time constraints. After incorporating TextPixAI into their workflow, they saw a remarkable improvement in their blog's traffic. The AI-generated sections not only saved time but also enhanced the overall quality of the content, leading to increased reader engagement and higher search engine rankings.
Case Study 2: Business Y's Content Marketing Boost
Business Y, a startup in the tech industry, aimed to establish thought leadership in their niche through their blog. With TextPixAI, they could efficiently generate informative and well-structured blog sections that resonated with their audience. As a result, they witnessed a significant increase in website traffic, lead generation, and social media shares.
Conclusion
In the ever-evolving landscape of content creation, TextPixAI emerges as a game-changing tool that empowers writers and marketers to streamline the process of generating engaging blog sections. By following the steps outlined in this guide and implementing SEO best practices, you can leverage TextPixAI to boost the quality and visibility of your blog content.
As you embark on your content creation journey with TextPixAI, remember that customization, optimization, and quality assurance are key to producing content that not only ranks first on Google but also captivates your audience and drives success in the digital realm.
Additional Resources
To further enhance your content creation and SEO skills, explore the following resources:
-
[TextPixAI Blog]: Stay updated with the latest tips and trends in content creation and AI-powered tools.
- U can also visit this tool to generate blog sections.
Thank you for reading, and best of luck in your journey to create outstanding blog sections with TextPixAI!